Pages - Menu

26 December 2013

Origami Heart


MERRY CHRISTMAS!!

A simple yet beautiful Origami Heart designed by Francis Ow.

Instructions on Francis Ow's website : Two Simple Heart: http://web.singnet.com.sg/~owrigami/hearts.htm

Video Tutorial by Tadashi Mori :


Time required: 5 minutes for one model

Paper used: Color printer sheets. (Colored on both sides)

Paper size : Any rectangular paper (that is sides of ratio 1:2). I have used 3 inch x 6 inch for this one.

Difficulty : Simple.

No of Units : Single sheet

No glue


24 December 2013

Origami Crane


Origami Crane(orizuru in Japan) is a traditional and one of the most famous Origami designs. It is a simple and great model to try for beginners. It is also considered very auspicious in Japan.

Difficulty : Simple and great for beginners.
Time Required : 10 - 15 min
No of sheets:  One square sheet. I have used 6 inch square sheet for the model in the photo.

Starting from Square Base, following are step by step folds to make an Origami Crane.

1. Square Base - http://or1gam1.blogspot.com/2013/12/how-to-make-origami-square-base.html


2. Fold the sides to meet the diagonal.

3. A triangle is formed above the folds. Fold it down to get a crease.


4. Open the triangle and the two side folds. Create a diamond  like fold like below, by bringing the tip up following the creases created. 


5. Repeat on the other side to get the below step


6. Repeat step 2 on the above fold. Repeat for the other side.


7. To get the neck. Squash fold like below.


8. Repeat on the other side, to get the tail


9. Fold the two upward flaps to get the wings


9. Squash fold the neck to get a beak. 


Extend the wings to collapse the sharp upper triangle to get the body of the crane


Video tutorial available here:


How to make Origami Square Base


One of the basic folds in Origami is the Square Base.Square Base is invariably used in many modules.

Following are the steps to make a Square Base.

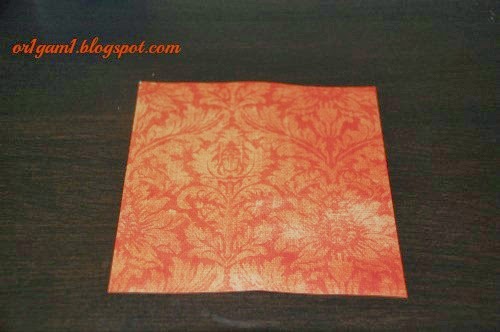
1. To start with, I am taking a 6 inch square sheet. Colored on one side and white on the other.


2. Fold the paper (colored side up) in half vertically. 


3. Fold the paper in half horizontally to get the below crease on the white side.


4. Fold the paper along the diagonal with white side up. 


5. Repeat the folding along the other diagonal, with white side up, to get the below crease.


6. With these folds, we have divided the paper into four squares. For the final step, press the center of the square (marked in blue) inwards. Bring the two sides, marked in black, on the line, marked in orange. The two orange lines lie on each other.


After the fold it looks something like this:


01 November 2013

Origami Decorations

This is my 50th post. Here's some decoration ideas:


9 intersecting Stars and Impatient Trillium 


Kusudama


Intersecting tetrahedra


Other models so far


26 October 2013

Fireworks by Yami Yamauchi


Paper:  Regular color printer paper used

Designed by: Yami Yamauchi

Tutorial : by Jo Nakashima


No. of units required: 12 (6 - Orange , 6 - Green)

Size of each single sheet: 4 inch square

Difficulty: Simple and very easy assembly.

Time: Can be finished with in an hour or so

No glue required.


11 September 2013

Evi's Rose


Paper used: Regular printer sheet

Nice tutorial by Tadashi Mori:


Difficulty: Simple - easy folds, edges need to be trimmed and folded to get a rose look. Has a flat base, easy to place it on table. I could have done better.

Paper Size: 8.5 inch square for above model

No glue/scissors required for this, Rose of Roses and Kawasaki Rose.

Time: 30 min or less


07 September 2013

Rose of Roses - Jordi Adell


Updated the above photo on 19 Feb  2022


Designed by Jordi Adell

Paper used: Normal color printer paper.

Nice tutorial by Sara Adams:


Difficulty: Easy , has a kawasaki like twist, I did this after kawasaki rose, felt fairly easy. Should modify after the final step to make it look like a rose, the better one modifies, the better it looks like a rose. Sturdy enough, not as sturdy as Kawasaki. Kawasaki folds are tight enough, won't come out easily even after a heavy throw.

Time: 30 min

Paper size:

The baby pink rose - 6 inch square
The dark pink rose - 8.5 inch square

Inspiration: http://blackswanfolds.blogspot.com/2013/04/rose-of-roses.html

I came across this type of rose through the above blog.


06 September 2013

Kawasaki Rose


I changed the blog appearance again for it is convenient to customize with default blogger template. The earlier template had not much options.
Check out the Gallery tab above, to view all the modeld in Google blogger dynamic view. Looks good :)

Kawasaki Rose


Did this on 22 June 2013.

Too many creases that are easy to make. I thought I might find Kawasaki twist a bit hard. When I tried it was not as difficult as I thought, it neatly got twisted.
One tip: While making creases before Kawasaki twist press it nice. I used my nail to press each of the crease. This might have made the Kawasaki twist easy.
After this the folds might get confusing, not impossible to figure out though. First time I folded 3 houses and I got stuck at 4th one, kept wondering where the flap must be folded, took few minutes to figure out.

Final model is very neat.

Reference: A very nice video by Marigami


First time (above photo)

Paper used: Color printer paper.

Paper size : 8.5 " x 8.5 "

Second time: (below photo)

Paper used: Scrap book Paper which is thicker than printer paper. I felt thicker paper works out well for this.

Paper size:  12 " x 12 "

***

No of sheets : one

Difficultly:  might not be easy for beginner level. Intermediate I would say

Time : can finish in 1 hour. Second time I took lesser time.

I felt bigger size paper looks good.Sturdy model. My scrapbook sheet has lot of embroidery designs, the rose done out of this paper doesn't look that clear in photo.

I didn't use any glue or paper clip while making this rose.

What I like about such model is it requires just one sheet.

After the Kawasaki twist:


Kawasaki Rose: Not very clear in this scrap book sheet sue to the design.


05 September 2013

Origami butterfly (michael lafosse)

michael lafosse

Paper used: Color printer sheet, both side colored. Use double color paper for a better look.

Difficulty: easy

Time:  30 minutes

Paper size: 8.5 square sheet

Tutorial by: Michael lafosse - His personal blog: http://www.pem.org/sites/origami/


Andrea's Rose


Andrea's Rose by J.C.Nolan - Folded by me using 8 inch printer sheets


Second tessellation I tried. 

Designed by - J.C. Nolan

Paper used: Color printer paper.

Time : 1 - 1.5 hours

Difficulty: moderately easy.

Size of the paper:

  1. 8 inch or 8.5 inch square to make the model in above photos with 6 layers
  2. 12 inch square to make the below model that I framed with 6 layers, the paper was too thick.
(Design is not very clear in the photo due to the color of the paper)

Suggestion: Printer paper with normal thickness suits well. Do not take a very thick paper, folding becomes difficult


Tutorial by Sara Adams - could not follow clearly after couple of steps.


This video is sufficiently clear and was able to complete with this guidance.


Started and completed on : 4th June 2013
Updated on 05 Jan 2021


10 August 2013

Hydrangea by Shuzo Fujimoto

4 layers with 8 inch paper


Hydrangea with different paper sizes


6 layers with 12"x12"


Designer :  Shuzo Fujimoto


Hydrangea is the first tessellation I tried. Nice thing is it requires just one paper.

Reference: 


Paper used: Color printer paper.


3, 4 and 5 layers with 8.5 inch x 8.5 inch


Difficulty:

Moderate, I got confused at couple of folds.

First attempt - 31 May 2013, I folded 3 layers. In the video Sara Adams clearly tells how to get another layer. I got little confused and stopped at 3 layers.

Second attempt - 3rd and 4th June:  I realized how to fold another layer and folded 4 layers and 5 layers.

Finally folded up to 6 layers and framed it.

Printer paper is good to fold, especially slightly thicker paper, not too thick, it becomes difficult to fold multiple layers.

Interesting read:

http://www.coolmath4kids.com/tesspag1.html


Started on 31 May 2013.

Updated 8 Jan 2021

04 August 2013

Kusudama fish curler

Designer :  Ekaterina Lukasheva

Tutorial available here: 


More info: http://www.kusudama.me/origami/Curler - Ekaterina Lukasheva's official page

No of units:  30 units.
Paper size used : 4" x 4"  
Difficulty: easy to make units and simple assembly.
Paper used: normal color printer paper
Time: 3-4 hours


23 July 2013

Rhombicuboctahedron curler units

Designer: Herman van Goubergen

No of units:  24 units.
Paper size used : 3" x 3"  
Difficulty: easy to make units and simple assembly.
Paper used: normal color printer paper
Time: 1 hour

Rhombicuboctahedron is an Archimedian solid with 8 triangular and 18 square faces. 
Further reading: http://en.wikipedia.org/wiki/Rhombicuboctahedron

Icosidodrcahedron - Rhombicuboctahedron - Cuboctahedron